Saturday, April 30, 2011

Fire socks!

After my Chicago sock fiasco I decided that I actually really enjoy knitting socks! They are small enough to try difficult stitch patterns on without totally stressing yourself out.

When we were in Lexington (super chill city btw) we visited a yarn store called Magpie Yarn. It turns out that we had celebrated St Patricks Day just a few doors down at a local eatery. I loved it as soon as we walked in because the yarn is arranged by color, so I was greeted with a wonderful rainbow of yarn.

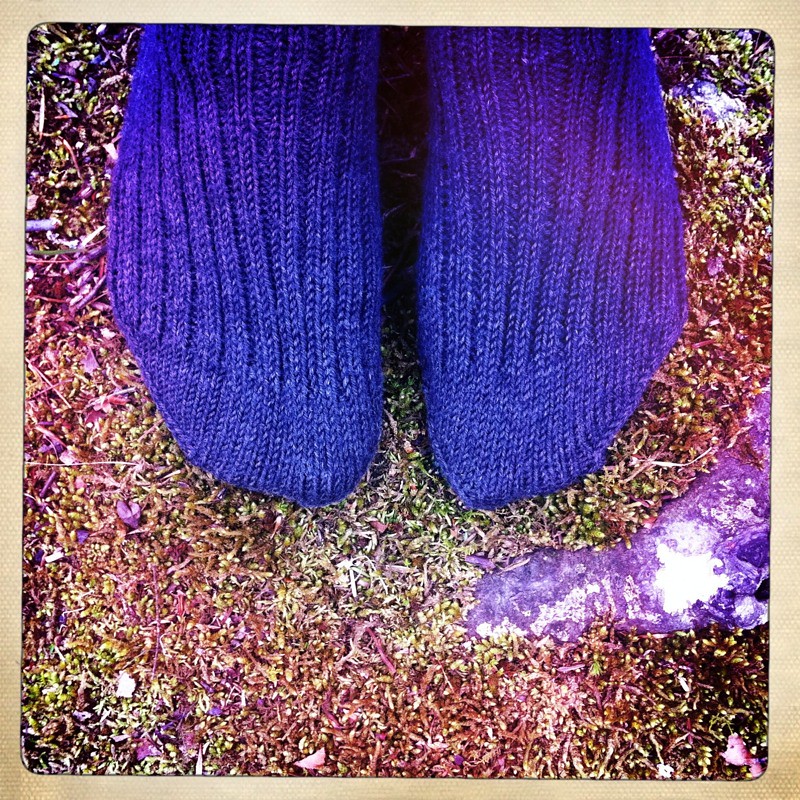
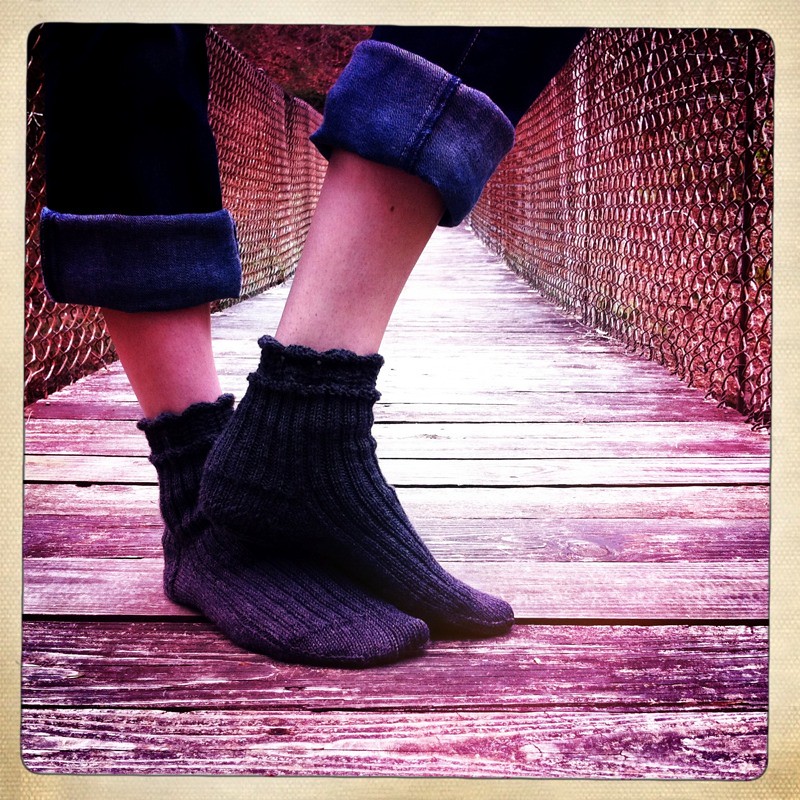
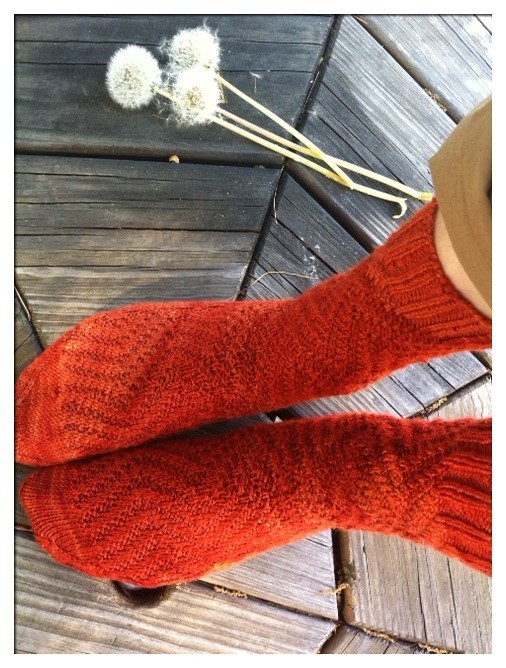
I checked out the sale bin and found nothing of interest so I moved on to the nearest section, it happened to be the reds and oranges. I picked up a skein of Shi Bui 100% merino wool in a very slightly variegated rust/orange color. This was the official yarn of my next project.

I am in general very drawn to pretty pictures. This ever so scientific method was how I chose the pattern for my fire socks (as I decided to call them because the color reminds me of fire). It is a pattern by SockPixie called Go With The Flow Socks. Funny part was that the pattern had a very poor flow, the instructions were all out of order and if you hadn't made a sock before you'd probably go nuts....or end up with a very odd looking blob of knitting.

The cool thing about is pattern is it is essentially just ribbing that is offset so once you get started the actual knitting of it is very simple. This is great for knitting in the dark during our shows! Overall the stitch pattern and slight variation in color of the yarn makes for a great look of depth and complexity when it is in fact quite simple.

Anyhow, here's the finished project! I love it!


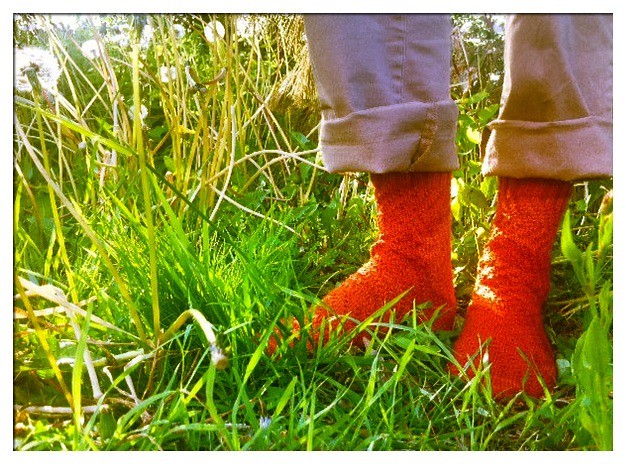
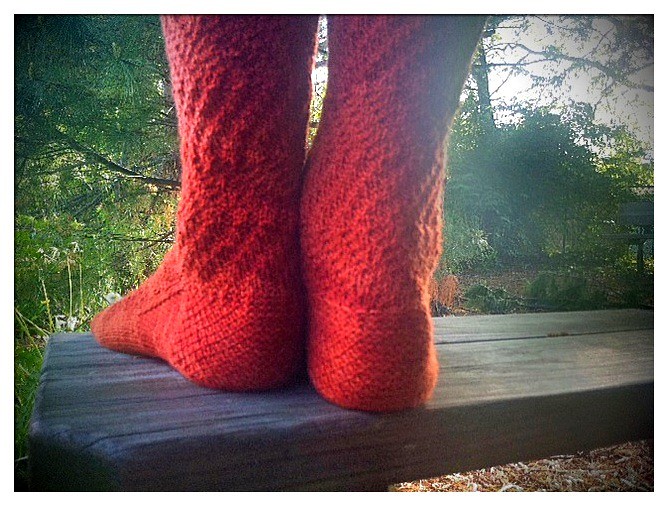
We took the pictures outside our hotel on some old picnic tables they had there. I think we confused everyone going in and out. I was standing on the table trying to take pictures of my feet then Johnny came out with his tripod to take pictures in an otherwise fairly non picturesque area, haha oh the lives we live :)

Friday, April 22, 2011

Beauty In Ashes

Spring is here and summer is fast approaching so I thought I'd work on something a little lighter than the thickest, warmest stuff I could possibly find (which is everything I've worked on this past 6 months or so. Let's face it, the East coast is FREEZING!)

I had one ball of Patons Lace yarn in my stash so I decided to try and come up with something to make out of it. The color is called "patina" and fades from charcoal to white and back to charcoal. With such variation in color I wanted the stitches to be very simple so the color and stitch work wouldn't be fighting to get your attention.


After searching about on ravelry.com and finding nothing particularly suited to my purposes I came up with this, the simplest lace pattern ever! Lace is just knitting where you purposely make holes so I decided to make a series of offset holes with a basic border and some garter stitch in between. This would be a great pattern for someone who is just beginning with lace knitting!


Here's the pattern I wrote if you'd like to give it a try!

Beauty In Ashes Shawl

Needle: size 11
Yarn: Patons Lace (patina), 1 skein
Gauge: not imperative to pattern

Abbreviations:
CO- cast on
k- knit
k2tog - knit two stitches together
p- purl
BO- bind off


CO 56 sts
Knit all stitches for 4 rows

Section 1:
Row 1- k 4, *yo, k2tog, k 2* repeat between *s until four sts remain, k 4
Row 2- k 4, p to last four sts, k 4
Row 3- k 4, *k2tog, k 2, yo* repeat between *s until four sts remain, k 4
Row 4 - repeat row 2

Repeat rows 1-4 three times (12 rows total)

Section 2:
knit 12 rows in garter stitch (knitting every row)

alternate sections 1 and 2 until you reach desired length (mine is 59in.), ending with section 1

knit 4 rows in garter stitch then BO all sts.

weave in ends.

To block:
I know blocking acrylic isn't necessary but I think it makes the piece look finished. DO NOT IRON! It will melt! I've found that if you wet the finished project and lightly press out the extra water with your hands then lay it out flat to dry in front of a fan you can achieve the desired result.


Have a fantastic Easter weekend everyone!

Friday, April 15, 2011

Altered Couture attempt 1

I really should check labels more carefully before buying clothing. I have this nasty habit of finding things that fit perfectly when I buy them and after one wash appear to have been made for a small child.

Here is an example of one such item of clothing I purchased this past fall and have been carrying with me since. Perhaps the pattern was just so alluring that I couldn't force myself to part with it and perhaps I kept it with the hopes that it would eventually just grow back to it's original size; either way I still had it and it was entirely useless to me in it's shrunken form.


I decided to try turning it into something entirely different. And if it didn't work, oh well, I couldn't use it in it's current state anyway. So on came the inspiration and out came the scissors!

I decided that I liked the pin tucks so I would try and keep that part.


I also liked the lace edges (no huge surprise, since my name is Lacie) so those would need to stay too.


I began by removing the sleeves and collar...


Then I cut the whole thing in half and turned the bottom half around (so the back was now in front). Then I reattached it, so now it buttons up in the back.

Next I turned under the edges of the collar to make a wide V neckline and attached straps made from the fabric of the sleeves.

For the back, I used one of the sleeve cuffs to make a finished edge at the top and to add a couple more buttons for a better fit.

To finish it off I added a small a piece to connect the back to the side under the arm and connected the straps to the back out the garment.

Here it is! It's a bit wrinkled from wearing it all day but you get the idea...


And the back...(it's not crooked, my shoulders were)


Because I primarily used pieces with finished edges and with buttons already attached I didn't really have much finishing work at all!

I was inspired to attempt this alteration by a blog called www.newdressaday.com.....you should definitely check it out!

Saturday, April 9, 2011

Oh the irony...

A couple posts ago I mentioned I was in Chicago for a hair show. A couple days after getting back on the road I received a picture text message from one of the friends I had stayed with...it was a beautiful blue and white, really warm looking sock. In fact it was my sock that I had left in Chicago. Sad day.

To most people losing a sock is no big deal. But I had exactly 7 pairs of socks, one for each day. This message meant that I would in fact need to get another pair of socks. Ok, so what's the big deal!?

As a part of my year long challenge I am not buying any clothing, including socks. That left me with a couple options, sew some (hmmm not likely)or knit some. Because I had less than a week before I would run out of socks and because I definitely didn't want to have to do extra laundry I became very determined to make some socks. Nothing like necessity to push you forward!

As long as I was going to be making socks I decided to design a little
something of my own. I wanted something a bit girly at the top but utilitarian at the base (inside the shoe where no one sees). I had on hand some dark grey merino/bamboo in the proper weight that I fancied would be super soft on the feet.

Because we had a ton of shows that week and not very much driving I found myself with a wonderful new pair of socks a mere 3 days later!

Here's what they look like,


I have decided to call the pattern "Shiloh"


I know you can't see the socks that well in this picture but I needed a reason to take a picture of this awesome wall!


And this was the super picturesque rope bridge we found for our little sock shoot! It is located at Camp Nathaniel where I met a very sweet girl named Shiloh, after whom I named this pattern


Ironically enough, this weekend we find ourselves in none other than Chicago! Which also means I got the original blue and white socks back. Haha c'est la vie!

Bon week-end mes Ami!

Wednesday, April 6, 2011

A peek inside my visual journal

For the last few years whenever I see a postcard, advertisement, graphic design of any sort including pieces of paper flying around on the street that I think look interesting I pick it up and put it in my collection. As an artist I am an incredibly visual person and looking at the bright colors and inspiring designs makes my soul happy. Until last May I would use the pieces I collected for various projects and as background pieces in my scrapbook. But one day as I was perusing the craft section at Barnes and Noble I picked up a book on art journals.

I fell in love! Finally something to do with my found pieces! Now I will admit that my visual journal is not nearly as gorgeous as the ones in that book but I figured I'd give you a peek at the contents anyway. Enjoy!

Here's what the outside looks like


And here's a few pages of the inside!


If you want to try something like this I would highly recommend it! Essentially you just throw in things that you think look cool. You can add as many layers as you like of whatever you want. And it can either include writing or be entirely wordless. I would love to see what you come up with!